PMc Software |
|
|
Mailboxes
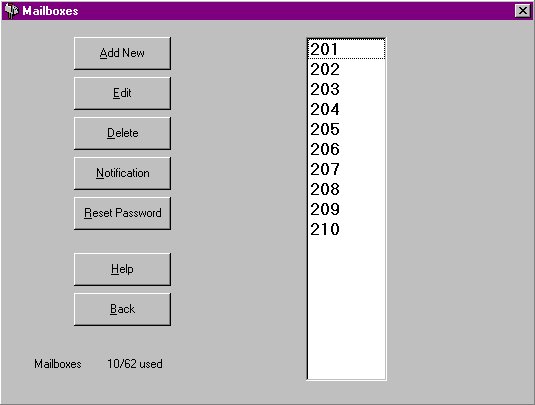
To make changes to your system mailbox
click on the Mailbox button. The following screen will appear.
Creating a new MailboxTo create a new mail box, click on the Add New Button. You will be asked to enter the number of the mailbox you wish to create. Enter it and click OK. You will next see the mailbox-editing screen (Picture 13). Editing an existing MailboxTo edit an existing mailbox click on the mail box number on the right hand side of the screen, then click on the Edit button. Double clicking on the mail box number will also cause you to edit the mailbox. The mailbox-editing screen is shown in Picture 13.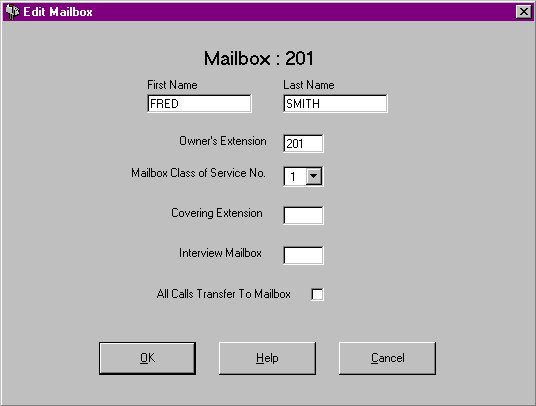 Enter the First and Last names of the
person who will own this mail box in the spaces provided. Note: The Voice Mail stores
these names in upper case so if they are entered in lower case they will be converted.
Enter the First and Last names of the
person who will own this mail box in the spaces provided. Note: The Voice Mail stores
these names in upper case so if they are entered in lower case they will be converted.
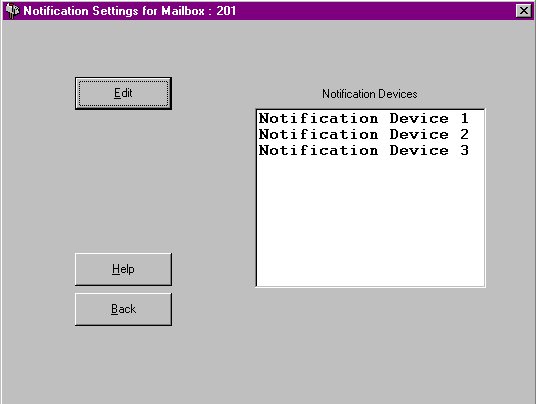
Enter the extension number of the person who owns this mailbox. Typically this will be the same number as the mailbox number. Select the Class of Service you wish to provide for this mailbox from the drop down list. If you wish to provide a Covering Extension and Interview Mailbox then you can enter them in the places provided. Click on the "All Calls Transfer to Mailbox" check box to enable this feature. For more information on these items see the on-line help. When you are satisfied with the setting click OK. To exit without changing, click the Cancel button. Mailbox Definitions:First Name: Is the name of the personLast Name: Is the last name of the person. The Last Name field is used by the Voice Mail system for the Dial by Name Feature. Owner’s Extension: This defines the extension the subscriber uses. Usually this is the same as the mail box number. Mailbox Class of Service Number: The class of service specifies the working parameters for the mailbox. Each class has fields that can be configured such as maximum message length and maximum number of messages. See Class of Service Editing for more information. Covering Extension: is used to take a call when the mailbox owner is unavailable. Pressing 0 while listening to the personal greeting of the mailbox allows the caller to reach this extension. This feature also works while recording a message. Interview Mailbox: is used with the Interview Service. The Interview Service allows a set of questions to be recorded in the Interview Mailbox and have them announced to the caller. The Interview Mailbox can be any free mailbox number. All Calls Transfer to Mailbox: sends all calls from the voice mail directly to the subscriber’s mailbox without calling his or her extension. Deleting a MailboxFrom the Mailboxes screen, (Picture 12) click on the mailbox number you wish to delete. Next click on the Delete button. You will be prompted to confirm deletion before the mailbox is removed.Resetting the Mailbox passwordFrom the Mailboxes screen (Picture 12) click on the mailbox you wish to reset. Next click on the Reset button. You will be prompted to confirm reset.The owner will now be able to enter his or her mailbox and set a new password if they wish. Notification DeviceThe Notification button in the Mailboxes screen (Picture 12) allows you to modify the notification settings for a mail box. The notification settings allow the Voice Mail to contact you when a new message has been left in your mailbox even if you are out of the office. Note: When the Voice Mail is using the notification feature on a port. That port cannot receive calls at the same time.First select the mailbox by clicking on it then click the Notification button. You will be presented with the following screen.
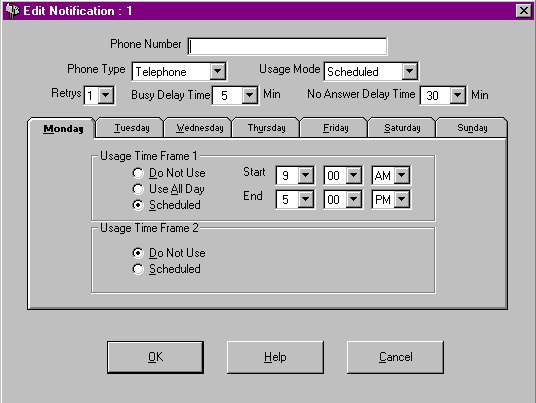
There are three notification devices that can be set for every mailbox. Each device can either be a telephone or a beeper. Devices are tried in order from 1 to 3 up to 10 times each. Setting / Editing Notification DeviceFrom the Notifications Screen select the device you wish to edit by clicking on it then click the Edit button. The Notification edit screen (Picture 15) will be displayed.Picture 15: Notification editing
In the phone number field insert the number you wish the system to dial. Remember if calling outside the office ensure that you include the codes to do this. See the on-line help for more information on setting this field. In the Phone Type box select whether it is a telephone or beeper that you are dialling. The usage mode determines how the device will operate. To disable the device select Do Not Use. To allow the device to operate all day every day select Continuously. To set a scheduling table select Scheduled. When scheduling is selected the Scheduling tab box for each day of the week will appear. Select the day on the tab and configure the device for each day. Two time frames can be set for each day. To set the first click on the Scheduled radio button and the Start and End times will appear. Set these times as desired. To set the second time frame click on the scheduled radio button in time frame 2 and set the times as required. Notification Definitions:Phone Number: This is the telephone number or beeper number of the device. Special feature codes are also entered here.Special feature codes are:
For example: 9T1234567 will first dial a 9 (to grab an outside line in this case), then the system will wait for a dial tone. Then the system will dial the number 1234567 Note: The callback number entry code "X", must be included in the number to be dialled, if "Beeper Callback No. Entry Mode" (Located under the Authorisation Tab when Editing a Class of Service) is activated by the Class Of Service and "Phone Type" is set to "Beeper". Please ensure you have sufficient pauses before the callback number entry code "X" when using this feature. Phone Type: Specifies the device to be notified, either beeper or telephone. Usage Mode: Specifies the usage of the device. The three options are: Usage Mode: Specifies the usage of the device. The three options are: Usage Mode: Specifies the usage of the device. The three options are:
Retry: Specifies the number of times that a notification call to the device is attempted after a busy or no answer condition. Retry: Specifies the number of times that a notification call to the device is attempted after a busy or no answer condition. Retry: Specifies the number of times that a notification call to the device is attempted after a busy or no answer condition. Busy Delay: Specifies the number of minutes the Voice Mail is to wait after a busy condition before retrying the device. Busy Delay: Specifies the number of minutes the Voice Mail is to wait after a busy condition before retrying the device. Busy Delay: Specifies the number of minutes the Voice Mail is to wait after a busy condition before retrying the device. No Answer Delay: Specifies the number of minutes the Voice Mail is to wait after a no answer condition before retrying the device. No Answer Delay: Specifies the number of minutes the Voice Mail is to wait after a no answer condition before retrying the device. No Answer Delay: Specifies the number of minutes the Voice Mail is to wait after a no answer condition before retrying the device. The scheduling tab box is a day of the week list that allows you to build your scheduling table. First select the day of the week you wish to modify by clicking on the appropriate tab. Now select how you would like this device to operate during this day. You have three options for Time Frame 1.
|
|
|